Touch to Pixels: UI Pipeline Internals on iOS
Touch to Pixels: UI Pipeline Internals on iOSA journey through hardware, backboardd, Core Animation, and the render server
I’ll save you 20 mins if you don’t want to read a whole blog post:
Copy it on a sticky note and leave it under your monitor for your next interview. Sponsored LinkMeet Rico by RevenueCat
I usually love the iOS Knowledge Interview™ format: 45 mins to flex my encyclopaedic knowledge of the Swift compiler, method dispatch, memory management or Mach-O binaries. Until recently. I was asked to “explain the rendering pipeline on iOS”. “Uh… so there’s a screen. It has pixels. It detects touches. I reckon Core Animation probably does something up in there…” It’s easy to let this slip. The system abstracts away the heavy lifting. But this heavy lifting controls every single pixel on every single frame of every app you build. It’s worth taking the time to understand it properly. The UI pipeline is a complex beast, orchestrating across several lightly-documented systems. It’s tough to find a throughline that can explain it all. Fortunately, you’re in good hands. We’re tracking the journey of a touch event: from sensors, to your code, and back up to pixels, through every system along the way:
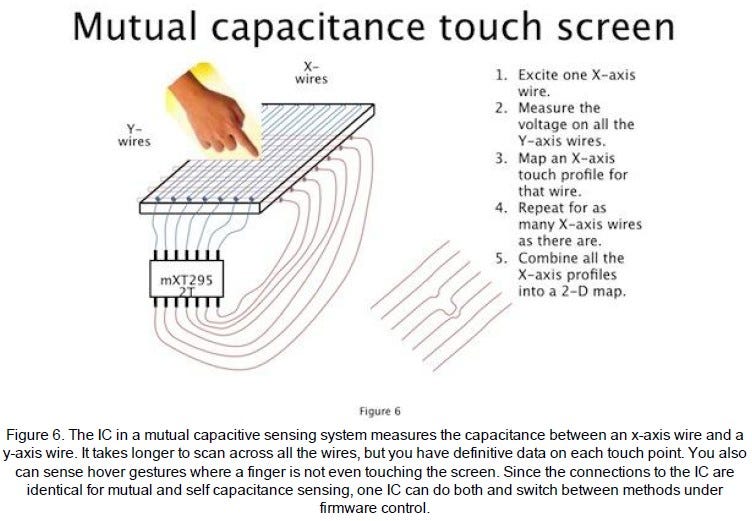
Handling Physical TouchThe HardwareIn the late 90s, Uncle Sam funded some research that led to breakthroughs in multi-touch capacitive touch screens. In 2007, Daddy Steve stuck this in front of a jumble of miniaturised tech that was finally ready for prime-time: modern microprocessors, a cellular radio, and high-capacity lithium batteries. The rest is history. Under the glass of your iPhone screen, there is a grid of transparent criss-crossing X and Y wires. A microcontroller applies an electric field across each X wire, and measures signals across each Y wire. Because human flesh is electrically conductive (don’t ask me how I found this out), the presence of a finger changes the electrical capacitance measured at XY intersections. The microcontroller scans across each wire to create a real-time 2D touch map.
The KernelThe kernel is the core of an operating system. It creates and manages abstractions on top of hardware:
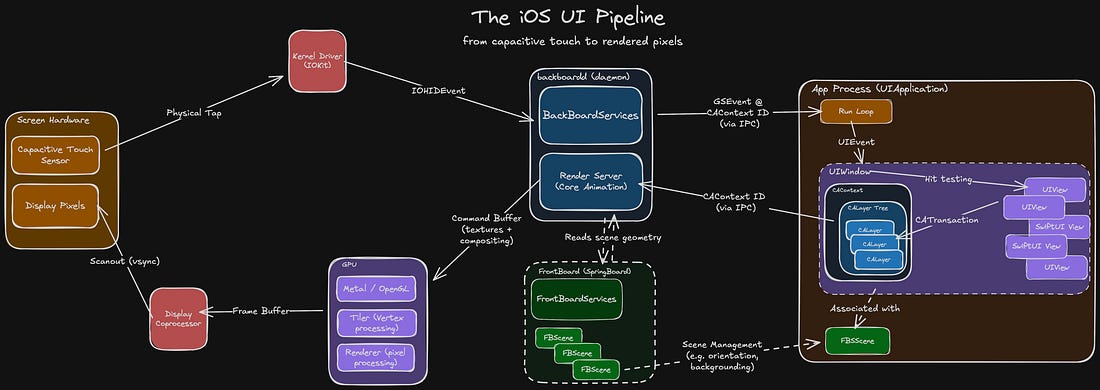
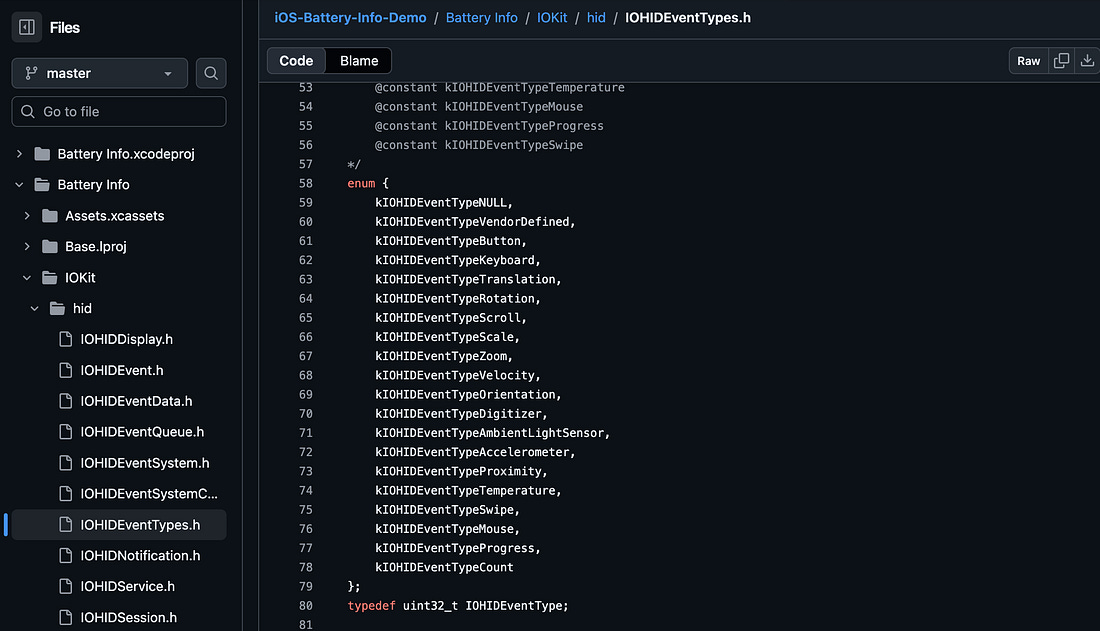
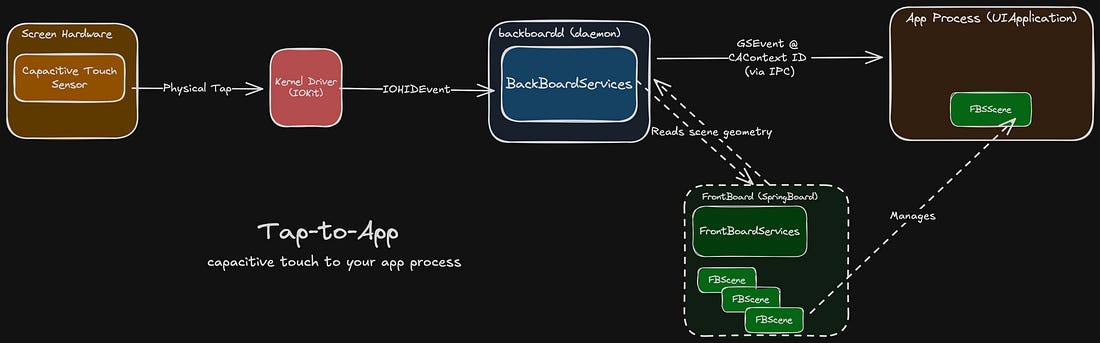
The kernel’s other main responsibility is I/O: that is, talking to the hardware. This interfacing is done via drivers, specialised software that translates input commands and output signals. The xnu kernel on iOS interfaces with the capacitive touch hardware via IOKit. The hardware sends signals that the OS decodes into an IOHIDEvent (IOKit human-interface device event) to represent touch events such as rotations, scrolls, or swipes. This event is sent to backboardd.
backboarddbackboardd is a daemon, which you can tell from the dangling D in its name. Daemons are background processes run by the OS. Just like their biblical namesake, they never sleep, and they’re always watching you. In the case of backboardd, it manages system tasks like screen dimming, reads input from hardware sensors like the accelerometer, and handles physical touch events.
BackBoardServices is a subsystem inside this daemon that performs bridging between device I/O and userland processes, including your app.
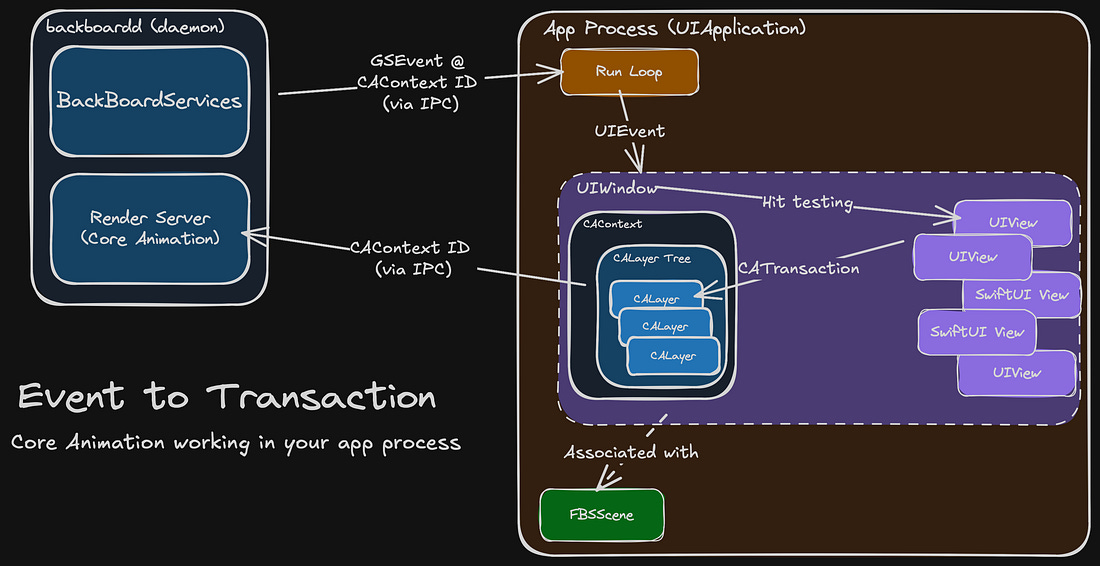
It generates a GraphicsServices event (GSEvent) for the touch and sends it to the relevant app process using inter-process communication (IPC), a secure communication channel provided by the OS. To determine the relevant app process, backboardd talks to FrontBoard (a part of SpringBoard). FrontBoard is what powers the app switcher, managing the on-screen visible “scenes” for stuff like the home screen and each individual app.
This scene, or FBScene, is associated with your app’s CAContext, or Core Animation context, underpinning all of your UI. BackBoardServices can read out the CAContext’s contextID to determine the correct app process for the touch event, and forward it on. The journey of a thousand miles begins with a single step. The journey of understanding the full end-to-end UI internals pipeline continues by paying me money. Keep reading to follow your tap as it enters your app’s run loop, then through CATransactions, IPC, the layer tree, the render server, the GPU, vsync, and pixels.
Core Animation inside your appThe Run LoopAn iOS application process always begins the same way:
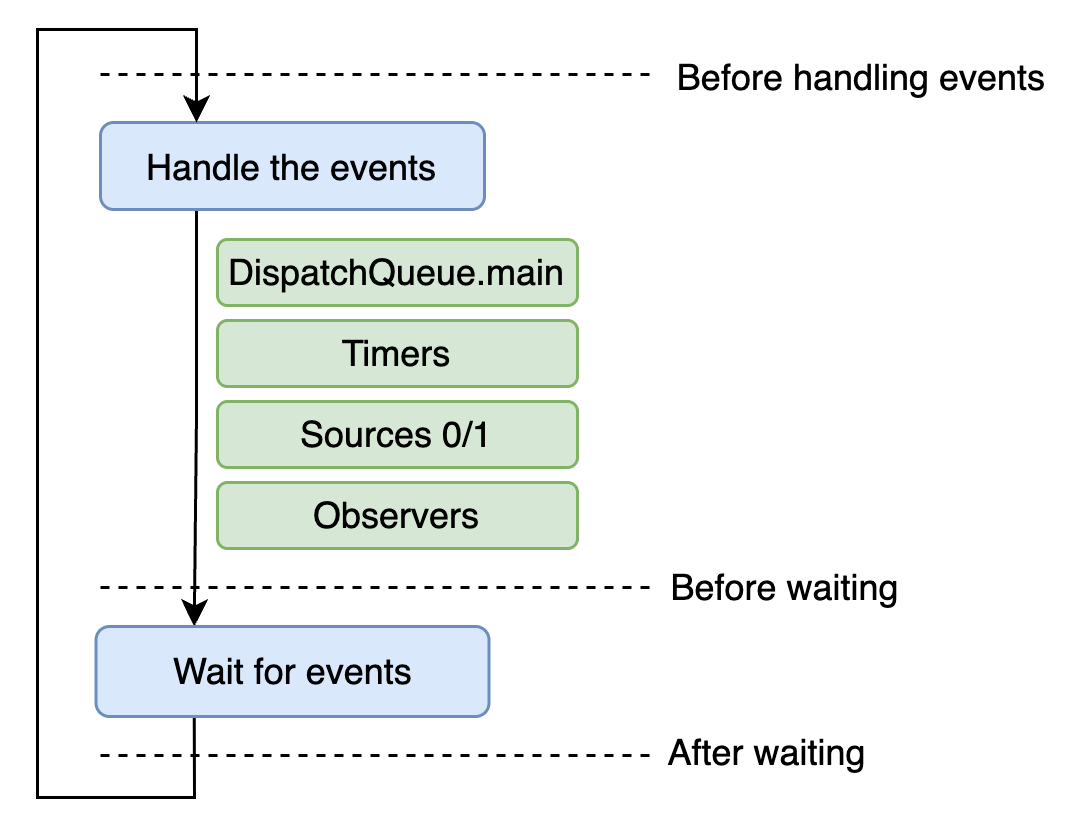
This run loop behaves like a permanent while loop, offering 2 basic states: waiting for stuff to happen; and doing stuff. The main run loop of your app is awoken by timers firing, code dispatched to the main queue, and signals from backboardd like our touch event.
UIEventsThe run loop passes touch events to the UIApplication object, which converts them into UIEvents and dispatches them via sendEvent(_:) to the relevant UIWindow for the active scene. The window, in turn, dispatches the event to a UIView, determining the target via hit testing.
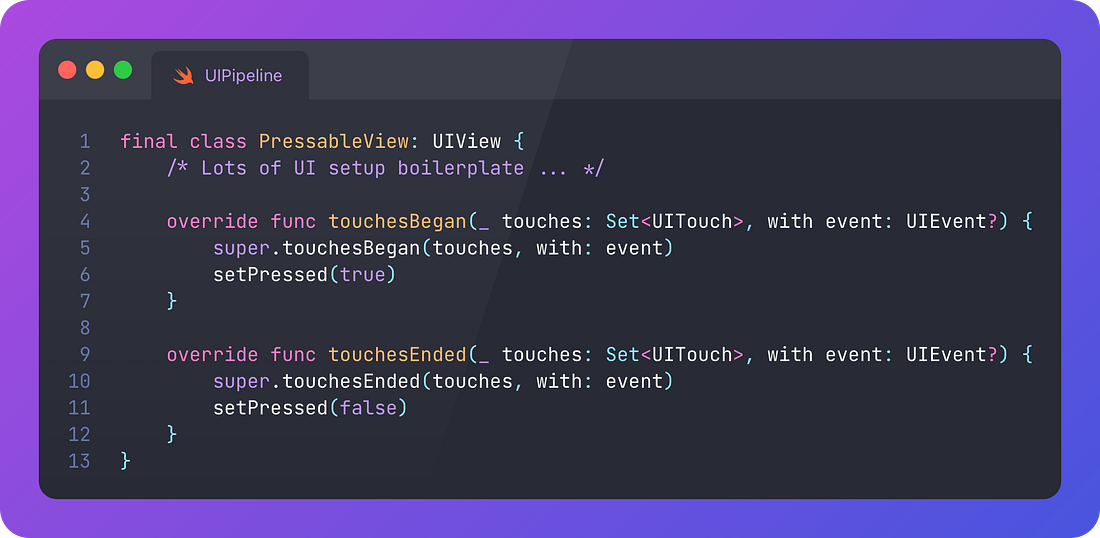
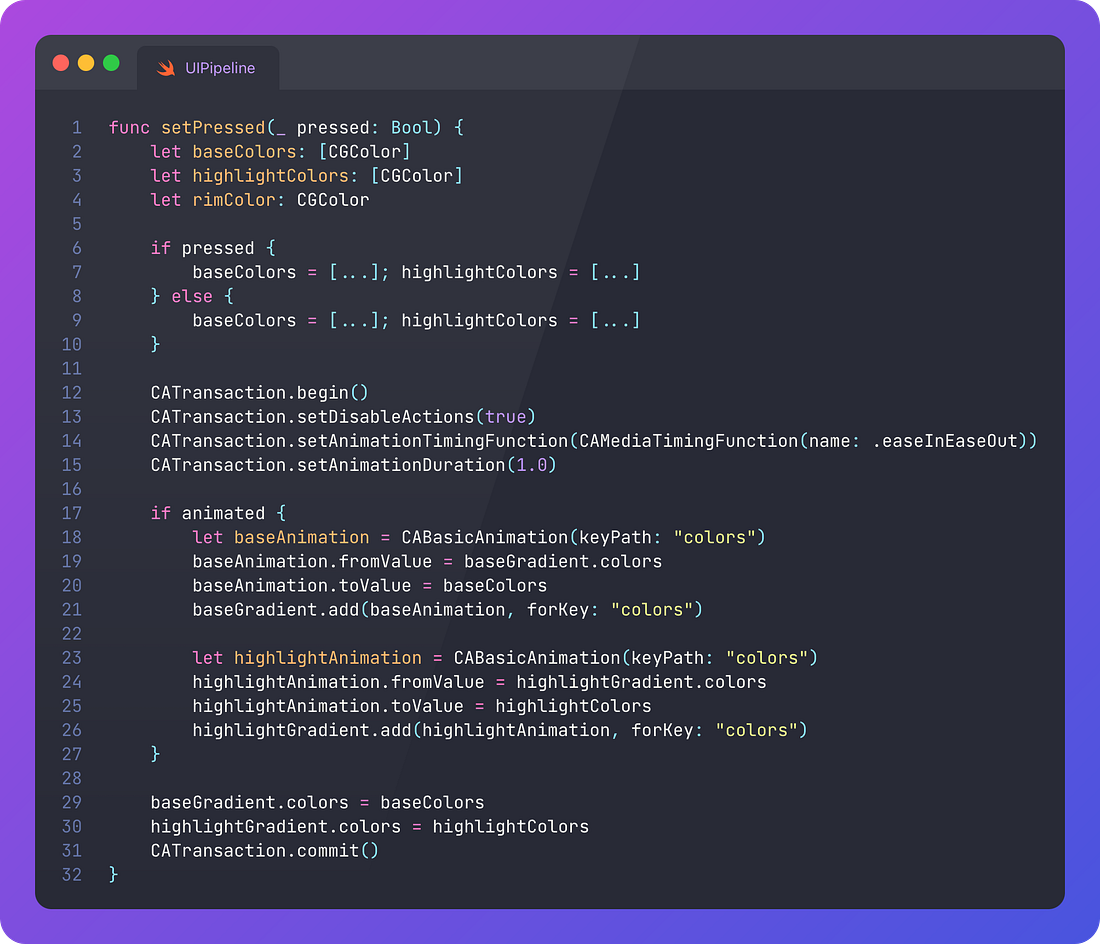
The UIWindow forwards the UIEvent to the target view, firing the touchesBegan(_:with:) method, or other appropriate UIResponder method. Now that we’re no longer mucking about inside subterranean system internals, we might as well demonstrate with a nice visual example to make the most of the light of day. Let’s create a custom skeuomorphic 3D button by subclassing UIView, complete with the aforementioned UIResponder methods: When a user touches down, it presses in. Just like a real button should. No liquid glass nonsense here. The full pipeline just ran before your eyes. Back up. To understand what happens after your tap event is registered, we should clarify that UIViews in UIKit are ultimately backed by Core Animation CALayers. CoreAnimation, Transactions, and CommitsCore Animation is the fundamental visual core of iOS. The primary API uses layers, lightweight objects with properties like frame, border, filters, shadow, and opacity. Regardless of whether you’re using UIKit or SwiftUI, the rendering in your app is done using Core Animation: visual content is arranged in CALayers, in a hierarchical “layer tree” owned by the UIWindow. The main benefit of Core Animation is that it can animate all these property changes super easily (compared to the olden days). You define a timing curve, such as linear, spring, easeInOut, (or even multiple curves with keyframes), to describe how the values of properties change over time. Core Animation interpolates from start to end values, along these curves, to create the visual animation state at each frame. It leverages the GPU to do this performantly via the render server. (I’ll explain soon). Part of our setPressed() method creates a CATransaction. A transaction represents an on-screen visual change or animation. We might batch up our visual changes into a single transaction for efficiency, synchronicity, to share timing code, or to access a completion handler. Writing CATransaction.begin() and CATransaction.commit() is an explicit transaction, posted to the render server on commit. Implicit transactions, changes without declaring a transaction, wait for the next run loop iteration before they commit*
Most UIKit work is done implicitly: consider every time you change the text colour of a label. This is ultimately rendered via implicit CATransactions. At the end of the run loop tick triggered by our initial tap event, the run loop fires CFRunLoopActivity.kCFRunLoopBeforeWaiting, which is observed by Core Animation. If the layer tree has changed, the changes are flushed by performing a commit. This Core Animation commit has 4 phases:
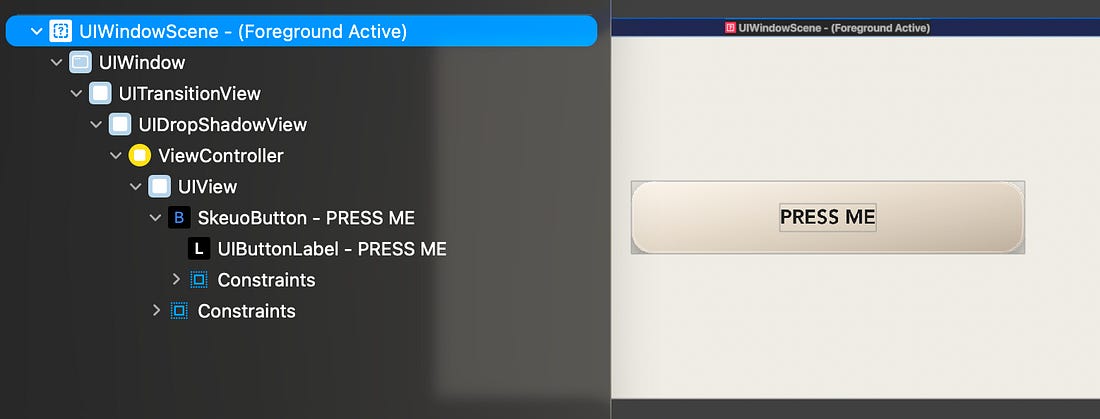
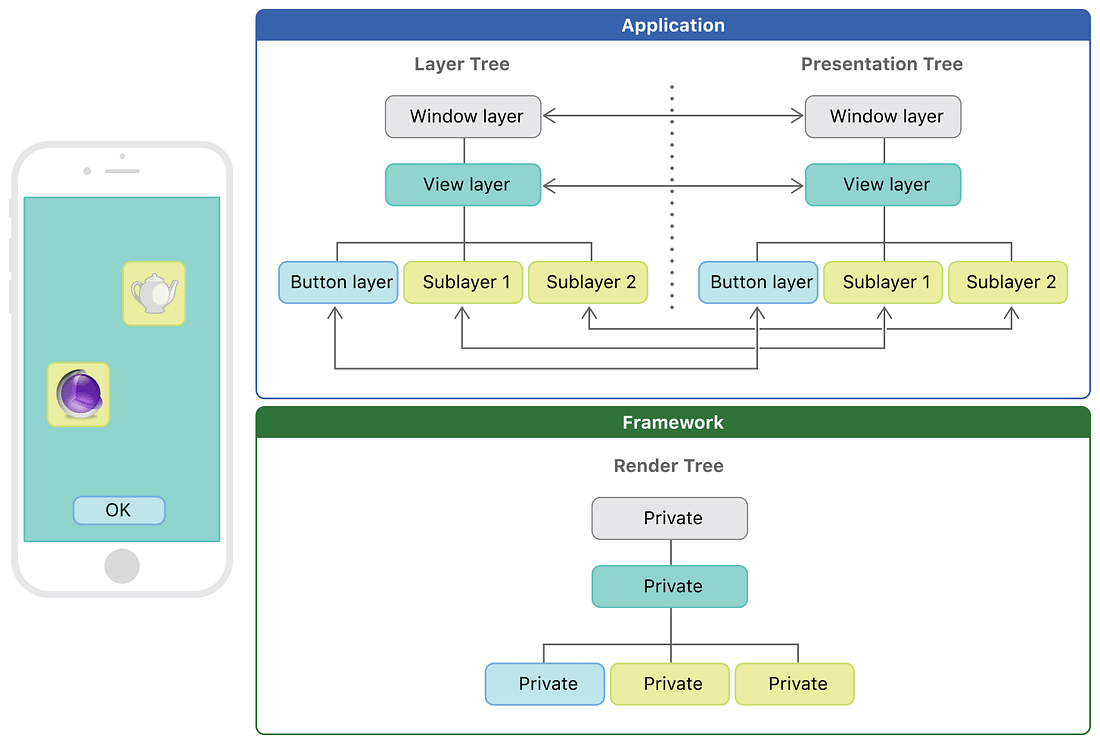
In our example code, we commit some CABasicAnimations. These are sent to the render server, a subsystem inside backboardd. I do hope you had a chance to work on your tan. We’re going back downstairs, into the shadowy bowels of the system. The Layer Tree and CAContextAnimations are performed by committing changes to properties on views. These commits are batched into transactions and flushed by the run loop tick implicitly, or explicitly sent via Core Animation to the render server. Before we leave your app process, we should clarify how Core Animation logically structures your UI. We already mentioned the layer tree: a hierarchical data structure containing the CALayers that collectively describe the visual content and animations in your UI. This is iOS’s internal representation of what is to be drawn. We can see its structure when you look at the UI debugger:
What I didn’t tell you is that there are actually 3 layer trees used by Core Animation. The Model layer tree stores the CALayers in their “final” state. When you set the backgroundColor property of a button from white to red, this instantly updates the model layer tree. Each CALayer of a view hierarchy is represented directly in the model layer tree (accessed via view.layer), with matching objects in the presentation and render layer trees. The Presentation layer tree contains the currently visible property values, including the interpolated values during an animation. This means, for our button colour above, it tracks the in-flight animation state of each frame from #FFFFFF (white), via #FFAAAA and its friend #FF5555, ultimately to #FF0000 (red). The Render layer tree is the “true” layer used to create the actual on-screen UI and perform animations. It’s private to Core Animation, living inside backboardd on the render server. The other two live inside the application process. Because rendering lives in a separate process, you will often see animations happily continue to run even when your main thread is blocked. You might, like me, be thinking “why do we need a presentation layer tree at all if it’s not used for rendering”? Because the presentation layer tree is accessible in your app process via view.layer.presentation(), you are able to read the current animation values, view the real-time geometry, and perform hit testing of inflight transitions. Your app’s UIWindow owns a CAContext, which itself owns the model and presentation layer trees. When you commit your CATransaction, this layer tree data is passed down to the render server.
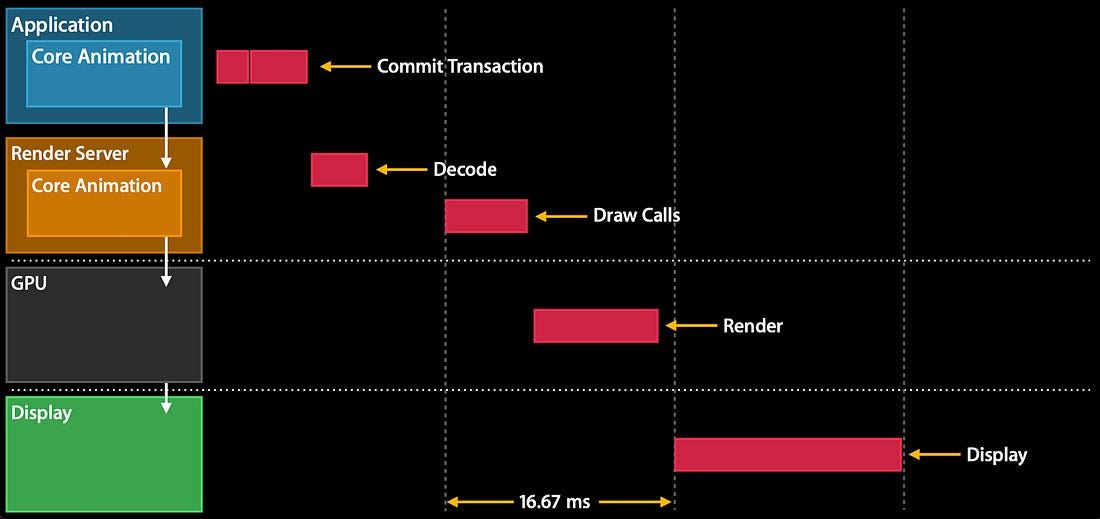
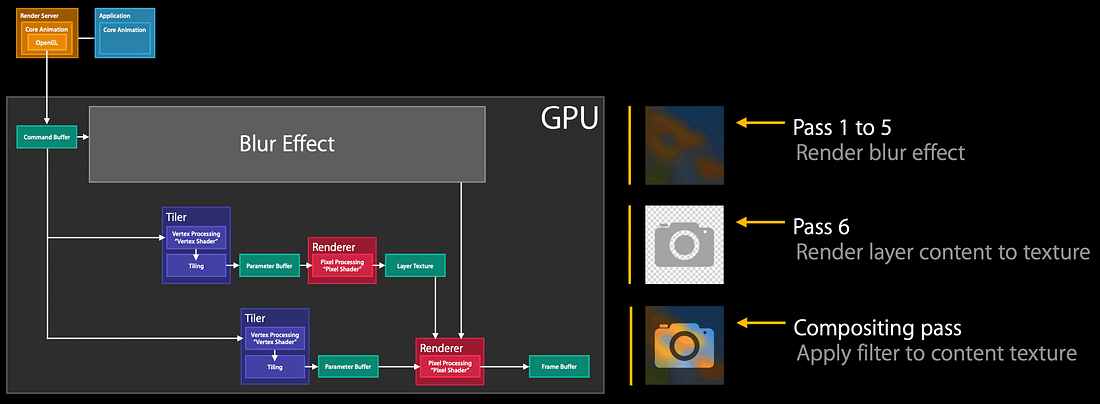
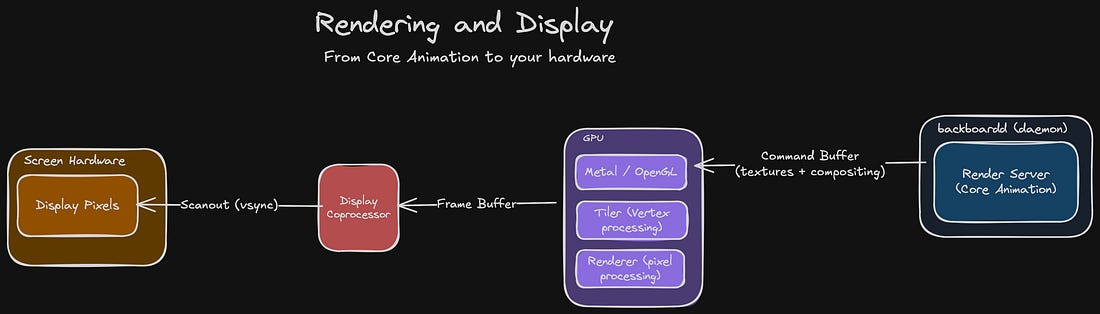
Compositing, Animating, and DisplayingThe Render Server (and lots of definitions)The CAContext of your app’s UIWindow bridges to the render server, and updates the render layer tree, via IPC: interprocess communication. This is a very sexy name for a very boring way that separate processes running on an OS exchange data (on iOS this plumbing is Mach-based). This IPC is keyed by the ID of the CAContext, matching it to its twin on the render server. CATransactions encode this ID alongside the committed updates to the render layer tree. The render layer tree is hidden from us, working in the shadows inside the Core Animation render server, which, on iOS, is itself a part of backboardd. Core Animation, the framework, consists of 2 halves: the client-side API you touch on the daily, and the server-side rendering engine that lives here. Hol’ up. Quick definition. WTF actually is “rendering”? Rendering is when you produce an image from input data. In this context, it’s the CALayer render trees running on the render server. Core Animation running on the render server does this by rasterising and compositing the layers in the render layer tree. For f*cks sake. More definitions? Fine. Compositing is the process of combining visual elements from separate sources into a single image. This includes each CALayer tree in each CAContext in each visible UIWindow. Rasterisation is taking a set of drawing instructions and producing a “raster image”, i.e. a texture/a bitmap/lots of pixels. Here, we can think of the various properties of each CALayer like frame, colour, and corner radius to be supplying these drawing instructions. The render server is the final authority for what displays on your iDevice screen. It collects together the render layer trees of all active CAContexts across every on-screen process, computes animations in real-time, and produces the final frame sent to your display hardware.
To produce this frame, the render server issues drawing commands to the GPU via Metal to perform the heavy lifting. These commands might include configuration, selecting shader functions, selecting textures, and the actual draw calls. The GPUThe GPU is a beast, capable of trillions of floating-point computations per second. Off the top of my head, you get something like 5k FLOPS per pixel per frame on a half-decent iDevice.
Think of the render server like the jockey, short in stature but fiery in disposition as he issues the relevant commands and base textures. The GPU is his intrepid workhorse. The jockey doesn’t draw pixels himself. It’s beneath him (one of the few things that is, ahaha. Because he’s quite short?). He describes what the next frame should look like, and submits the description to the GPU in a command buffer. iPhones use tile-based deferred rendering, which consists of 3 main stages (grossly oversimplified, with apology to all you graphics buffs reading):
These stages convert the commands (and often input texture, in the case of text or images) into a full bitmap.
You can submit work directly to the GPU from your app with Metal, via CAMetalLayer or MTKView. The render server will still composite the result. Display Controller, Frame Buffer, and VSyncAfter the vertex and fragment shaders have done their work, composition and rasterisation is complete: the visible CAContexts across all visible windows on your device have been rendered as a single bitmap representing this frame of UI. Now to put them on a screen. The bitmap for the frame is placed on a frame buffer in memory and read by the display coprocessor, a dedicated chip on the Apple Silicon SoC, coordinates this final step. This chip reads out pixels from the buffer, applies colour space management, and talks to the screen display hardware driver. It “scans out” the final pixels, line by line, to the display. This scanout, assuming you aren’t hitching, is synch’d with the display hardware refresh cycle, vsync, which ordinarily clocks in at 16.67ms (60fps), or perhaps 8.33ms (120fps) if you’re a millionaire.
On iOS, the display coprocessor uses vsync (vertical sync) to lock the frame to the display refresh rate boundary. This is why UI performance issues lead to dropped frames: on other systems, this can manifest as tearing, where the frame buffer is swapped out mid-scan, rendering multiple frames in different parts of the screen simultaneously. Screen Display HardwareIn the final step of our Odyssey, our tap ultimately changes some pixels on your screen. Look, you didn’t subscribe to Jacob’s Tech Tavern to learn how LCD/OLED screens work. Read a book, for Christ’s sake.
The Full UI PipelineHere’s that summary again. Print it out. Get it on a Displate. Share it on your socials for clout. Instead of a shadowy, scary group of lads, now you might see them as new friends. Perhaps you want to get a beer with them. I sure need one. 
Last OrdersFrankly, I don’t think I would have been able to code this UI pipeline from scratch. I probably wouldn’t even be able to vibe code it. Core Animation was the culmination of decades of evolution across both hardware and software. iOS is also a thing. Yeah, rendering’s hard and I’m tired, so please do me a favour and imagine a really nice conclusion, there you go. Sponsored LinkMeet Rico by RevenueCat
Sources
Sent from my iPhone
|